Difference between revisions of "Rapoville"
| Line 123: | Line 123: | ||
|-|Jowee=[[File:Jowee.gif|center|link=Jowee]]<center>'''Jowee'''</center> | |-|Jowee=[[File:Jowee.gif|center|link=Jowee]]<center>'''Jowee'''</center> | ||
|-|*Wilfre=[[File:Wilfre.gif|center|link=Wilfre]]<center>'''Wilfre'''</center> | |-|*Wilfre=[[File:Wilfre.gif|center|link=Wilfre]]<center>'''Wilfre'''</center> | ||
| + | |-|‡Amy=[[File:Amy_idle_down.gif|center|link=Amy]]<center>'''Amy'''</center> | ||
|-|Bubba=[[File:Bubba.gif|center|link=Bubba]]<center>'''Bubba'''</center> | |-|Bubba=[[File:Bubba.gif|center|link=Bubba]]<center>'''Bubba'''</center> | ||
| − | |-|Cindi=[[File:Rapo-Girl.gif|center|link=Cindi]]<center>'''Cindi'''</center> | + | |-|‡Butler=[[File:Butler_idle_down.gif|center|link=Butler]]<center>'''Butler'''</center> |
| + | |-|*Cindi=[[File:Rapo-Girl.gif|center|link=Cindi]]<center>'''Cindi'''</center> | ||
|-|†Circi=[[File:Circi.png|center|111x111px|link=Circi]]<center>'''Circi'''</center> | |-|†Circi=[[File:Circi.png|center|111x111px|link=Circi]]<center>'''Circi'''</center> | ||
| + | |-|‡Click=[[File:Click_idle_down.gif|center|link=Click]]<center>'''Click'''</center> | ||
|-|Cookie=[[File:Cookie.gif|center|link=Cookie]]<center>'''Cookie'''</center> | |-|Cookie=[[File:Cookie.gif|center|link=Cookie]]<center>'''Cookie'''</center> | ||
|-|Count Choco=[[File:Choco Idle.gif|center|link=Count_Choco]]<center>'''Count Choco'''</center> | |-|Count Choco=[[File:Choco Idle.gif|center|link=Count_Choco]]<center>'''Count Choco'''</center> | ||
|-|Crazy Barks=[[File:Crazy barks.gif|center|link=Crazy_Barks]]<center>'''Crazy Barks'''</center> | |-|Crazy Barks=[[File:Crazy barks.gif|center|link=Crazy_Barks]]<center>'''Crazy Barks'''</center> | ||
| + | |-|‡Crazy Diggs=[[File:crazyDiggs_idle_down.gif|center|link=Crazy Diggs]]<center>'''Crazy Diggs'''</center> | ||
|-|Cricket=[[File:CricketIdle.gif|center|link=Cricket]]<center>'''Cricket'''</center> | |-|Cricket=[[File:CricketIdle.gif|center|link=Cricket]]<center>'''Cricket'''</center> | ||
|-|†DJ=[[File:DJ2.png|center|111x111px|link=DJ]]<center>'''DJ'''</center> | |-|†DJ=[[File:DJ2.png|center|111x111px|link=DJ]]<center>'''DJ'''</center> | ||
| Line 135: | Line 139: | ||
|-|Farmer Brown=[[File:Farmer brown.gif|center|link=Farmer_Brown]]<center>'''Farmer Brown'''</center> | |-|Farmer Brown=[[File:Farmer brown.gif|center|link=Farmer_Brown]]<center>'''Farmer Brown'''</center> | ||
|-|Galileo=[[File:Galileo.gif|center|link=Galileo]]<center>'''Galileo'''</center> | |-|Galileo=[[File:Galileo.gif|center|link=Galileo]]<center>'''Galileo'''</center> | ||
| − | |-|Heather=[[File:Heather.gif|center|link=Heather]]<center>'''Heather'''</center> | + | |-|*Heather=[[File:Heather.gif|center|link=Heather]]<center>'''Heather'''</center> |
|-|Indee=[[File:Indee Idle.gif|center|link=Indee]]<center>'''Indee'''</center> | |-|Indee=[[File:Indee Idle.gif|center|link=Indee]]<center>'''Indee'''</center> | ||
|-|Isaac=[[File:Isaac.gif|center|link=Isaac]]<center>'''Isaac'''</center> | |-|Isaac=[[File:Isaac.gif|center|link=Isaac]]<center>'''Isaac'''</center> | ||
| + | |-|‡Key=[[File:Key_idle_down.gif|center|link=Key]]<center>'''Key'''</center> | ||
| + | |-|‡King Miney=[[File:kingMiney_idle_down.gif|center|link=King Miney]]<center>'''King Miney'''</center> | ||
| + | |-|‡Kyren=[[File:Kyren_idle_down.gif|center|link=Kyren]]<center>'''Kyren'''</center> | ||
| + | |-|*Mike=[[File:Mike2.gif|center|link=Mike]]<center>'''Mike'''</center> | ||
| + | |-|‡Mildew=[[File:Mildew_idle_down.gif|center|link=Mildew]]<center>'''Mildew'''</center> | ||
| + | |-|‡Miles=[[File:Miles_idle_down.gif|center|link=Miles]]<center>'''Miles'''</center> | ||
| + | |-|‡Moe=[[File:Moe_idle_down.gif|center|link=Moe]]<center>'''Moe'''</center> | ||
|-|Mya=[[File:Raposa-Female.gif|center|link=Mya]]<center>'''Mya'''</center> | |-|Mya=[[File:Raposa-Female.gif|center|link=Mya]]<center>'''Mya'''</center> | ||
| − | |||
|-|NavyJ=[[File:Navy j.gif|center|link=Navy_J]]<center>'''Navy J'''</center> | |-|NavyJ=[[File:Navy j.gif|center|link=Navy_J]]<center>'''Navy J'''</center> | ||
| + | |-|‡Nima=[[File:Nima_idle_down.gif|center|link=Nima]]<center>'''Nima'''</center> | ||
| + | |-|‡Oma=[[File:Oma_idle_down.gif|center|link=Oma]]<center>'''Oma'''</center> | ||
|-|Pirate Beard=[[File:Pirate beard.gif|center|link=Pirate_Beard]]<center>'''Pirate Beard'''</center> | |-|Pirate Beard=[[File:Pirate beard.gif|center|link=Pirate_Beard]]<center>'''Pirate Beard'''</center> | ||
|-|Samuel=[[File:Samuel.gif|center|link=Samuel]]<center>'''Samuel'''</center> | |-|Samuel=[[File:Samuel.gif|center|link=Samuel]]<center>'''Samuel'''</center> | ||
| Line 150: | Line 162: | ||
'''†Only in Drawn to Life: The Next Chapter (Wii)''' | '''†Only in Drawn to Life: The Next Chapter (Wii)''' | ||
| − | |||
| − | |||
| − | |||
| − | |||
| − | |||
| − | |||
| − | |||
| − | |||
| − | |||
| − | |||
| − | |||
| − | |||
| − | |||
| − | |||
| − | |||
| − | |||
| − | |||
| − | |||
'''‡Only in Drawn to Life: Two Realms''' | '''‡Only in Drawn to Life: Two Realms''' | ||
| − | |||
=={{Icon|Question}} Trivia == | =={{Icon|Question}} Trivia == | ||
Revision as of 00:00, 14 December 2020
| Rapoville | |
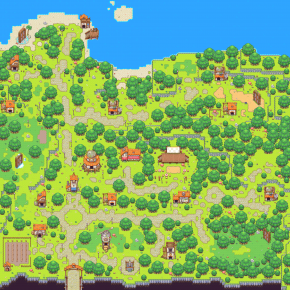
The Village as it appears without Shadow. | |
| Characteristics | |
|---|---|
| Mayor | The Mayor (Formerly) Mari |
| Population | 51 (DtL) 15 (Wii) |
| Specialization | None Magic (Presumed) |
| Creations | (Listed Below) |
| Information | |
| Number | Starting (0) |
| Levels | 5 Warp Gates (DtL) 4 Warp Gates (Wii) Circi Loves Wilfre (Wii) |
| Sections | 10 |
| Games | |
| Navigation | |
| Last Village -- |
Next Village -- |
Rapoville, also known as the Raposa Village is a village in the Drawn to Life Series. The Village has many different features and buildings in it, some of which are Gates that lead to other parts of the world. It is roughly divided into different areas by the Gate locations and compass directions.
 Story
Story
Drawn to Life
Rapoville is the main village and hub area of Drawn to Life. At the beginning of the game, the Village is almost entirely covered in Darkness and nearly all the villagers have left. Throughout the game the player must progress by bringing back Templates and Raposa from levels to bring life back to the Village, and clearing Darkness periodically to reveal new areas. Once they have reached a certain point in the game, the player can also give the Village a new name of their choosing.
At the end of the game, there are 51 villagers in total occupying the village.
Drawn to Life: The Next Chapter (Wii)
Rapoville, called exclusively Raposa Village in this game, acts once again as the main hub for the Hero and Raposa. The Village had some of it's objects stolen, such as Isaac's Door and the Village Bridge, which the Hero must restore throughout the game. Circi believes that Zsasha is responsible for the crimes, but his innocence is proven when he is rescued from the Monkey King. After hearing from Zsasha that a shadowy figure was seen in Jangala, Circi fears that Wilfre had returned and began to spread the news to the villagers.
Eventually, the Hero needs to collect the four Artifacts of Power to stop Wilfre, and after collecting one, Circi stores it in Town Hall. At the end of the game, Circi is revealed to have been in love with Wilfre, and uses the Artifacts, along with the Book of Life, to try to recreate Wilfre, who was still deceased due to the events of the first game. She fails at doing so and creates the Giant Scribble Monster, flooding the Village with ink in the process. The Hero and Mari team up to defeat the monster, and when they do, the Village all celebrate the Hero for saving them.
Drawn to Life: The Next Chapter
At the beginning of Drawn to Life: The Next Chapter, Wilfre drains all of the color from the Village and the Raposa are forced to take shelter on Turtle Rock. The Village is not revisited again until the very end of the game; instead the game takes place across four other villages: Watersong, Lavasteam, Galactic Jungle, and Wilfre's Wasteland. Even when the Village is revisited at the end of the game it cannot be explored in any way.
 Village Features
Buildings and Locations
- Village Entrance
- Village Hall
- Creation Hall
- The Village Pedestal
- Isaac's Shop
- Banya Farm
- Cookie's Restaurant
- Jowee's House
- Cricket's Station
- Village Stage
- Village Observatory
- Beach
- Secret Beach
- Docks
- Lighthouse
- Town Statue
Gates
Village Creations
Buildings and Locations
- Lighthouse
- Tackle House
- Mari's House
- Village Hall
- Cookie's Restaurant
- Jowee's House
- Creation Hall
- Isaac's Shop
- Village Observatory
- Cricket's Station
- Windmill
- Raposa Sports
- Farmhouse
- Zsasha's House
Gates
Village Creations
 Named Residents
*Formerly
†Only in Drawn to Life: The Next Chapter (Wii)
‡Only in Drawn to Life: Two Realms
Trivia
- The player can access the Norteastern section of the village while the clouds are only partially cleared; doing so will cause the Minimap to go black.
- The entire village area uses a color palette of less than 256 unique colors.
- This count does not include creations drawn by the player.
- After renaming the village in Drawn to Life, the new name cannot be changed.
- Out of all the various villages in the games, this one seems to be most connected to The Creator.
 Media
Media
A picture of the village from the start screen of Drawn to Life.
Raposa Village as seen in Drawn to Life: The Next Chapter (Wii).
The Village area as seen at the beginning of Drawn to Life: The Next Chapter.
Rapoivlle as seen in Drawn to Life: Two Realms.


